The Image Intake Conveyor Belt: How I Get Images From My iPhone Into Cloudinary
AI Marketing Systems Strategist
A simple iPhone-to-Cloudinary workflow using Google Drive and Make — and the two dead ends I hit before landing on it.
If you work with images for a living, you already know the problem isn't getting images. It's where they show up.
Someone texts you six photos of a new storefront. A warehouse teammate sends product shots from their phone. A sales rep AirDrops you pictures from a trade show booth. A headshot arrives by email. Something lands in Downloads.
Receiving the image is easy. The annoying part is everything after: saving it, finding it again, uploading it somewhere you can actually use it, and remembering which copy is the real one.
I do most of my web image work in Cloudinary. So I wanted one thing: when an image needs to become a usable web asset, I drop it in one obvious place and it shows up in Cloudinary without me touching it again.
I call the result The Image Intake Conveyor Belt.
The whole system
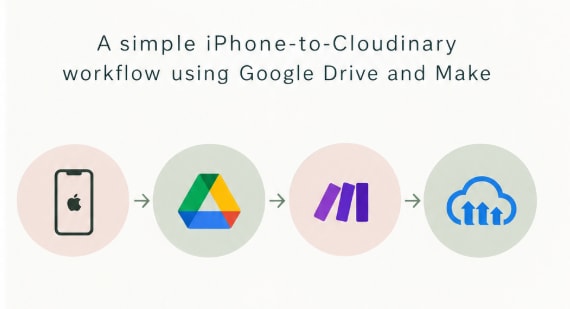
iPhone or desktop → Google Drive My Drive root → Make → Cloudinary Home → sort later
It's written for the people I think need it most: marketers, agency owners, freelancers, and ecommerce and B2B teams who handle a steady stream of images from clients, colleagues, and their own camera rolls.
It's not fancy. That's the point. But I took a couple of wrong turns before it got this simple, and those turns are the most useful part of the story.
Part 1: How I Got Here — The Webhook Wall and the Folder I Kept Tapping Into
Dead end #1: send the image straight to a Make webhook
My first instinct was the direct route. Build a Make webhook, send the image from my phone straight to it, and let Make push it into Cloudinary. Phone to automation to library, no middleman.
Then I hit the wall. Make's own documentation is clear about it:
“The maximum allowed webhook's payload size (Content-Length) is 5 MB (5.242.880 bytes) regardless of the subscription tier.”
Five megabytes sounds like plenty until you remember what images actually weigh now. A full-resolution photo from a recent phone can get close to that on its own, and sending a file inside a request usually means encoding it, which makes it bigger still. Product shots, event photos, anything someone sends “in the best quality” — those are exactly the files I care most about, and they're exactly the ones most likely to bounce.
A workflow that silently fails on your best images isn't a workflow. So I stopped trying to push files into Make and flipped it around: put the file somewhere with real storage first, and let Make go get it.
Dead end #2: a tidy “Image Intake” folder in Google Drive
Google Drive was the obvious middle step. It's already on my phone, it's in the iPhone Share menu, and Make connects to it easily.
So I did the organized thing. I created a dedicated intake folder and pointed Make at it.
And every single time I shared an image from my iPhone, I had to tap into Drive, find that folder inside My Drive, open it, and then save. Every time.
That doesn't sound like much. But capture is the step that happens most often, usually while you're doing something else — standing in a shop, answering texts between calls, scrolling through a thread of photos. Any friction at capture is friction you pay over and over. It's also the friction most likely to make you think I'll deal with this later, which is how images end up stranded in a text thread for three weeks.
What I did instead: use the root
Before I'd even finished testing the intake-folder version, I changed the rule.
Instead of a special folder, I made the root of My Drive the intake point. When you share to Google Drive from an iPhone, My Drive is right there. No navigating. Share, Google Drive, save. Done.
The rule became:
If a loose image is sitting in My Drive, it's on its way to Cloudinary.
That one change made the whole thing usable. The lesson I'd pass along to anyone designing an intake system, for images or anything else:
Lesson learned
Design for the capture step first. The organizing can be as tidy as you like later — but the moment of capture has to be almost thoughtless, or you won't do it.
Part 2: Why the Conveyor Belt Works (and Why It Deletes)
Google Drive is the handoff, not the library
This is the mindset shift that makes the rest click. In this setup, Google Drive isn't where images live. It's the loading dock.
Each service gets one job:
- Google Drive — the temporary intake point.
- Make — the automation that finds incoming images and moves them.
- Cloudinary — the working media library where images actually get used.
Two inboxes you can read at a glance
What I like most about this design is that it gives you two visual inboxes, and each one means exactly one thing:
Loose image in My Drive
Waiting to be transferred.
Loose image in Cloudinary Home
Transferred successfully — not filed yet.
When it's working, the root of My Drive stays empty. If an image is still sitting there hours later, that's your signal something needs attention. The intake point doubles as a failure queue for free.
Why I delete the Drive copy
People sometimes flinch at this part. Deleting feels risky.
But I like my images living where there's room for them and where they're ready to use. Cloudinary is built for exactly that: hosted, optimized, and ready to drop into a website, a landing page, a product listing, or an ad without another download-and-reupload loop. Keeping a second copy stuck in Drive doesn't make that asset any more useful. It just makes Drive messier and leaves you wondering which version is current.
So once an image has safely landed in Cloudinary, the temporary Drive copy goes. The loading dock gets swept.
The word doing the work there is safely. The delete only ever happens after Cloudinary confirms the upload — more on that rule in a minute, because it's the one that matters most.
Need to keep originals? Archive them on purpose
Some files need long-term retention: original shoot files, anything under a contract, raw assets you might need to re-edit. That's a real need. It just isn't this workflow's job.
I keep archives separate, in OneDrive, and they don't participate in the automation at all:
Original / archive → OneDrive
Working web asset → Google Drive root → Cloudinary
Keeping those responsibilities apart is what lets the conveyor belt be aggressive about cleanup. Don't use an intake queue as backup storage.
Part 3: Build It — Capture, the Make Scenario, and the Safety Rules
You need three accounts: Google Drive, Make, and Cloudinary. That's it.
Capture on iPhone
You don't need to save anything to Photos first. When someone texts you images, or they arrive in any app with a Share button:
- Select the image or images you want.
- Tap Share.
- Choose Google Drive.
- Save to My Drive — don't navigate into any folder.
That's the entire capture step. It's intentionally boring. The fewer decisions it asks of you, the more likely you'll actually do it.
You might be tempted to build an iPhone Shortcut to automate even that. I'd skip it. Google Drive doesn't always expose a persistent destination folder cleanly through Apple's file actions, and if the native Share menu already gets you to My Drive in two taps, a Shortcut adds more moving parts than it removes.
Capture on desktop
Same rule. When an image is sitting in Downloads, an email, or anywhere else, move or copy it into the root of My Drive. The automation doesn't care where the image came from — text, email, AirDrop, a client portal, a browser download. The source changes. The rule doesn't.
Skip the build
Get the ready-made scenario — and the eReader edition
Drop your email and I'll send you the share link to my Make scenario, so you can import it instead of building the four modules by hand — plus The Image Intake Conveyor Belt as an eReader book. You'll connect your own Google Drive and Cloudinary accounts.
Prefer to build it yourself, or want to understand what the scenario is doing before you import it? Here's every module.
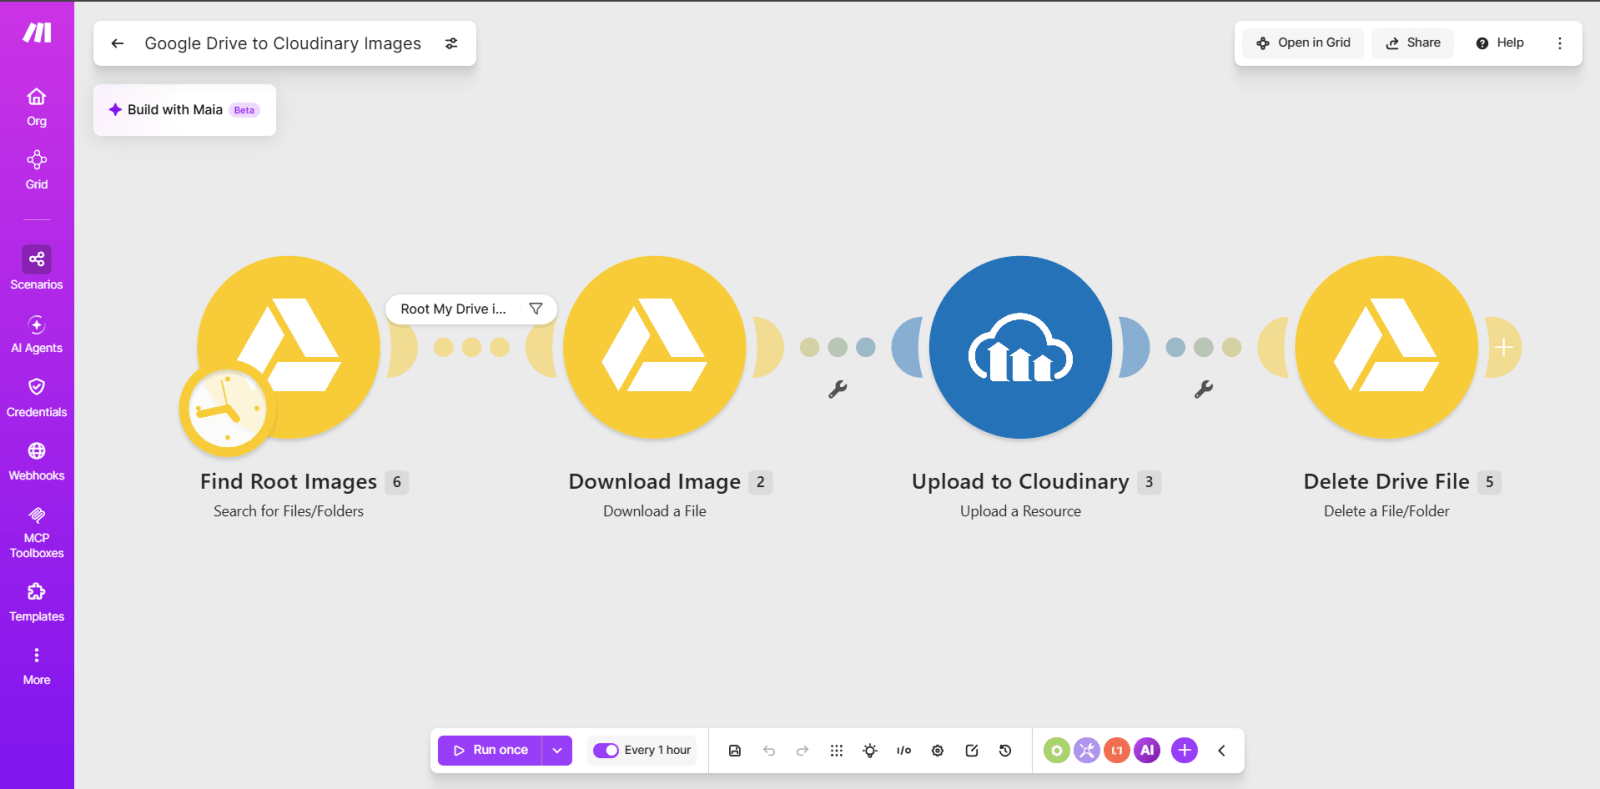
The Make scenario: find → download → upload → delete
Four modules in a straight line, plus one filter. The order matters, especially the last two.
Module 1: Find Root Images — Google Drive “Search for Files/Folders”
I deliberately did not use a “Watch All Files” trigger. A broad watcher can pick up images anywhere in your Drive, including images you've intentionally filed inside project folders. That's dangerous in a scenario whose last step deletes the source file.
A search constrained to the root is much safer. Here's how mine is set up:
- Choose a Drive: My Drive
- Search Scope: Limit to the chosen folder — and leave Choose a Folder empty. Make's own help text says it “defaults to the root folder if no folder is chosen,” which is exactly what we want.
- Retrieve: Files
- Search: Enter custom search query
- Limit: 50 per run
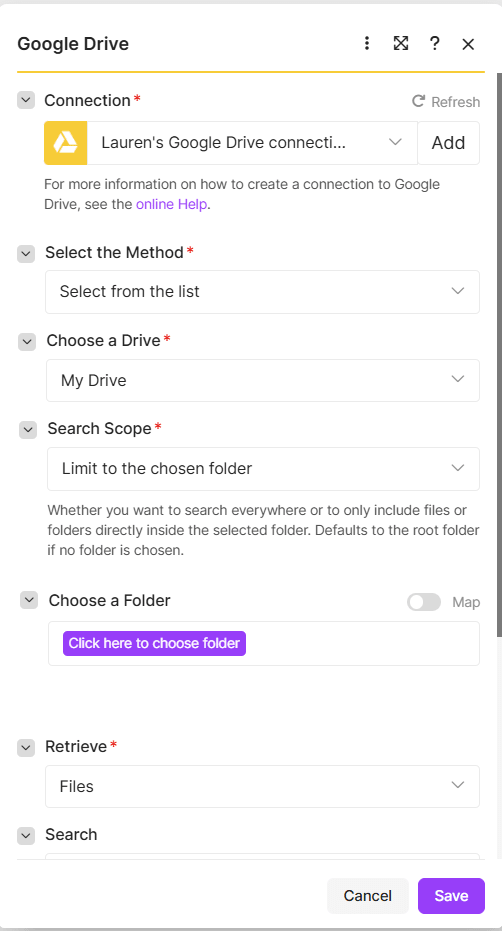
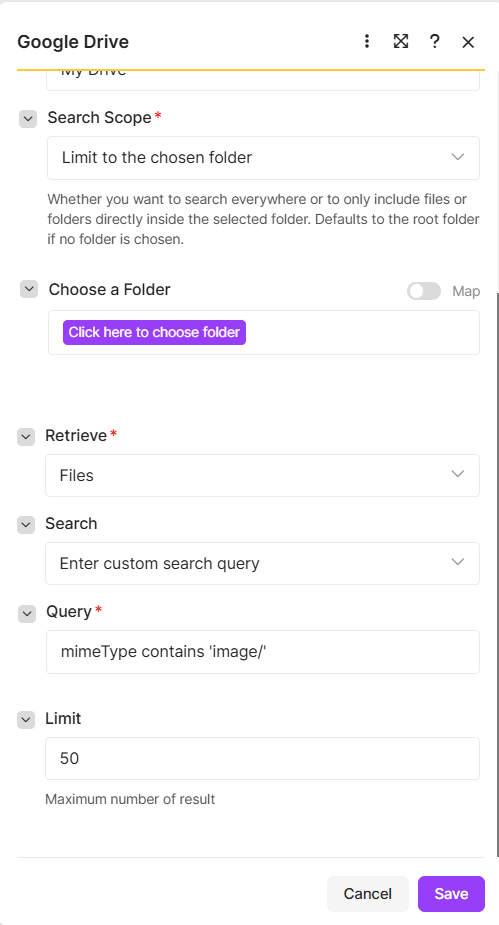
For the query, use this:
Search query
mimeType contains 'image/' and trashed = false
The query in my screenshot is the shorter version — mimeType contains 'image/' on its own. Add the trashed = false part. Google's own API reference is explicit that a file search “returns all files by default, including trashed files.” Without that clause, an image you've already thrown away can still match, get downloaded, and land in Cloudinary on the next run.
If your version of the module doesn't offer the folder scope option, you can express the root constraint in the query itself instead:
Alternative — root constraint in the query
'root' in parents and mimeType contains 'image/' and trashed = false
Make's module options change from time to time, so use whichever form your account exposes. What matters is the result: root only, images only, nothing from the trash, no subfolders.
The filter: “Root My Drive images”
Between the search and the download, I added a filter that only lets a file through if its MIME type starts with image/. The search already asks for images, so this is belt and braces — but it costs nothing, and it means a PDF or a Google Doc can never reach the delete step by accident.

Module 2: Download Image — Google Drive “Download a File”
The search result tells you which file to move. The download step gets the actual file data Cloudinary needs. Map the file from the search results and pass its data, name, and MIME type forward.
Module 3: Upload to Cloudinary — “Upload a Resource”
- File Type: Base64 Encoded Data URI (Make labels this one at roughly 60 MB)
- File: the output of Google Drive – Download a File
- MIME Type: mapped from the download module
- Resource Type: image
- Folder: leave it empty
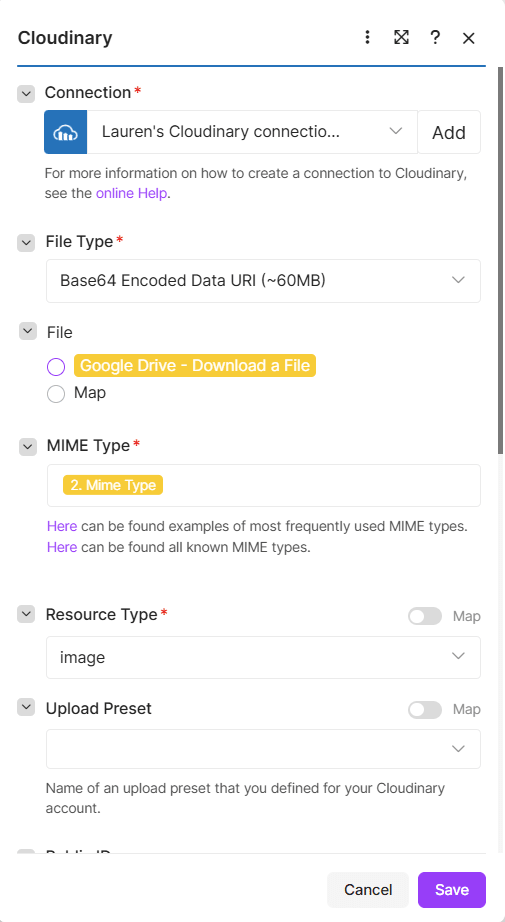
Leaving the folder empty is deliberate. When no asset folder is specified, Cloudinary puts the upload in the root of your media library — Home. That makes Home your visible sorting queue.
Resist the urge to have the automation guess which folder an image belongs in. The strength of this setup is that capture is fast and sorting happens later, when you're actually working with the assets and know where they go.
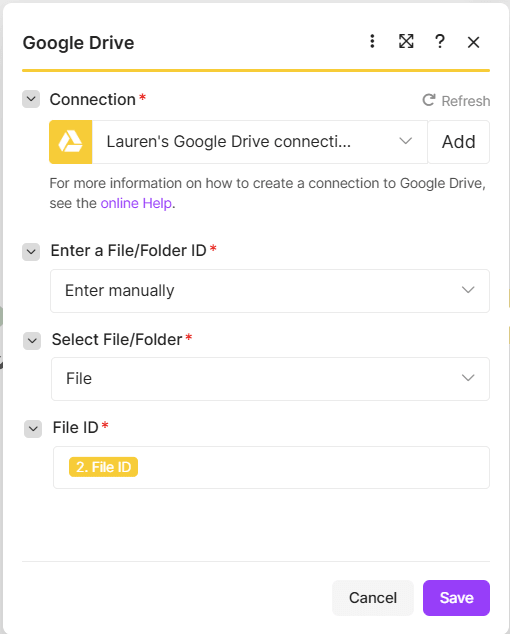
Module 4: Delete Drive File — Google Drive “Delete a File/Folder”
Select File, enter the ID manually, and map the File ID from the download module. This is the last module in the chain, and it has to stay last.
The one rule that matters most: upload before delete
Never delete the Google Drive source until Cloudinary has successfully accepted the file.
The sequence for each image is:
- Find a qualifying root-level image.
- Download it from Google Drive.
- Upload it to Cloudinary.
- Cloudinary returns the uploaded asset's details.
- Only then, delete the Drive copy.
Because the delete sits after the upload on the same path, it only runs for a file once the upload module has come back successfully. If the upload fails, the chain stops before the delete, the image stays in My Drive, and the next run tries again.
Don't take my word for that, though. Don't take anyone's. You're going to prove it in Part 4 before you trust this with files that matter.
Set the schedule
Because this uses a search rather than an instant trigger, it runs on a schedule. Mine runs every hour.
For normal business asset intake, there's rarely a reason to run it constantly. Every run uses Make operations whether it finds anything or not, so pick a frequency that gets images into Cloudinary soon enough for how you actually work. If you're usually pulling an image into a page the same afternoon, hourly is plenty.
The safety rules
Keep these intact even if you customize everything else later:
Root only. Images inside Drive folders are not intake assets.
Images only. Never let the automation consume every file type in My Drive.
Nothing from the trash. Keep trashed = false in the query.
No recursive folder processing. Your organized folders and archives stay untouched.
Upload before delete. The Drive source survives every failed Cloudinary attempt.
Cloudinary Home is the sorting queue. Don't overcomplicate capture with early organization.
Archives live elsewhere. If originals need long-term retention, archive them on purpose.
The whole system in one view
From iPhone
Someone sends an image → select → Share → Google Drive → My Drive
From desktop
Download or file → My Drive root
Make (hourly)
Search root-level images → filter → download → upload to Cloudinary → success → delete Drive source
Cloudinary
New asset appears in Home → review → move into the right folder when convenient
Optional archive
Originals that need long-term retention → OneDrive or another archive
Part 4: Test Before Trusting It, Plus Troubleshooting
Any automation that deletes files earns a proper test before it touches something that matters. Grab three disposable images — screenshots are perfect — and run these in order.
Test A — the happy path
Put an image directly in My Drive. Run the scenario.
Expected: it appears in Cloudinary Home, then disappears from Drive.
Test B — the folder you must not touch
Put an image inside an existing Drive subfolder. Run the scenario.
Expected: nothing happens. The image stays exactly where it is.
Test C — the failure
Temporarily break or disable the Cloudinary upload step. Put a disposable image in My Drive and run the scenario.
Expected: the upload fails and the image is still in Google Drive.
Test C is the important one. It's the only test that proves the delete can't run ahead of a failed upload. Only once all three behave correctly should the conveyor belt handle important assets.
Quick build checklist
- ☐ Google Drive shows up in the iPhone Share menu.
- ☐ Sharing an image to My Drive puts it directly in the root.
- ☐ Make searches only the root of My Drive.
- ☐ The search returns only image MIME types.
- ☐ Trashed files are excluded.
- ☐ Images inside subfolders are ignored.
- ☐ Make can download the matching image.
- ☐ Cloudinary receives the full image.
- ☐ The new asset appears in Cloudinary Home.
- ☐ Drive deletion happens only after a successful upload.
- ☐ A failed upload leaves the source image in Drive.
- ☐ Several images dropped at once all process in one run.
Troubleshooting
An image is still sitting in My Drive hours later
The upload didn't succeed, or the scenario didn't run. Check the scenario's run history in Make for an error on the Cloudinary step, and confirm the schedule is switched on. Because of the upload-before-delete rule, the image will be retried on the next run once the problem's fixed.
An image never got picked up at all
It almost always landed somewhere other than the root — inside a folder, or in a shared drive rather than My Drive. Open Drive and look at where it actually saved. Also check the file really is an image; something that arrived as a PDF won't match.
The same image shows up in Cloudinary more than once
Two usual causes. Either the query is missing trashed = false, so a trashed file keeps matching — or the upload succeeds but the delete fails, so the file stays in Drive and gets uploaded again next hour. If an image is in both Drive and Cloudinary, look at the delete step first.
I dropped in a big batch and only some moved
That's the search limit doing its job. Mine is set to 50 per run, so anything beyond that waits for the next one. Raise the limit if you routinely drop larger batches.
A very large file fails on upload
The Base64 option in Make's Cloudinary module is labeled at roughly 60 MB. That's far more headroom than a 5 MB webhook, and plenty for normal marketing images — but unusually large files need a different route. The good news: a failed upload leaves the original safely in Drive.
Optional improvements, once it's dependable
Once the basic belt runs reliably, you can layer on small improvements without changing the capture habit: an error notification when an upload fails, preserving original filenames, tagging automated uploads in Cloudinary, logging transferred asset IDs, or adding selected video formats.
Add them one at a time, and only after the simple version has earned your trust. The most valuable feature is still the simplest: getting an image from wherever it arrived into your working media library with almost no friction.
The one-sentence version
If you forget everything else, keep this:
The Image Intake Conveyor Belt
Drop any image you want in Cloudinary directly into My Drive. Make moves it to Cloudinary Home and removes the Drive copy only after a successful upload.
Neither of my first two attempts was wrong exactly. The webhook was the cleanest idea on paper, and the intake folder was the tidiest. They just both put the effort in the wrong place.
The version that stuck makes capture thoughtless and saves the thinking for later, when I'm actually working with the images. For anyone who handles images all day, that's usually the right trade.
If you build your own version — or hit a snag I didn't cover — get in touch and let's talk it through.